Pages

Wednesday, July 17, 2013

DIY Inexpensive Curtain Rods

As I was making great headway with stenciling the curtain panels for my patio, I started to give some real thought as to how I was going to hang these panels.  Our screened-in patio is about 15 ft long by 14 ft. wide, which would require lengthy drapery rods.  Just for kicks, I began searching the internet for "outdoor drapery rods".  I found several sites that offered them at a hefty price, which I knew I wasn't about to pay. So, after talking this over with my hubby, we decided to head to Home Depot to look at the aluminum conduit.

Aluminum conduit comes in 10 ft. lengths, and is extremely inexpensive.  It comes in varying diameters, 1/2" and 3/4 inch to name a couple.  We opted for the 3/4" diameter.  To me it just looked more substantial, and I wanted a heavier rod that would hold the panels without problem.


Since 10 feet in length wouldn't be sufficient for one wall, we bought (2) 10 ft length pieces for each wall, of which we only had 3 walls.  We were able to get a sales associate to cut the rods to the length that we wanted them.  This is really helpful as my SUV isn't long enough for anything over 9 ft. long.  You might think we opted to get two 7 ft. long pieces for the 14 ft. wall, and 7.5 ft. long pieces for the 15 ft long wall, but we didn't.  Here's the reason, we knew we would need to use a coupling to join the two pieces together to create one rod, and we also knew that we were going to put adjustable rod brackets at the ends and one in the center.  I was only able to find rod brackets at Home Depot that were for rods up to 3/4" in diameter. With the rod already 3/4" in diameter, the coupling would have made the rod too big in diameter to fit in the bracket.  So we decided to place the couplings off centered from the brackets that were on center with the wall.

We also purchased at Home Depot three couplings, also 3/4" in diameter.

 I can't remember exactly how much they cost, but they weren't super cheap.  I'm thinking with all the conduit, couplings and the brackets we spent a little over $60.

We also bought adjustable rod brackets in a black finish, that accommodates rods up to 3/4".  These came 2 to a package and were $5/a piece.  I needed 9 brackets so I purchased 5 packages.  We also bought some Satin Black Krylon Spray Paint, 2-3 cans, as I wanted them to have a black finish.

If you have a pipe cutter, it will help immensely, as my hubby didn't have the sales associate at Home Depot cut the conduit to the exact length, as we thought we should first get the brackets up where we wanted them and then measure.  So, he used his little pipe cutter to cut the conduit to the exact length he wanted.  We placed the brackets at each end and then also in the center of the wall.  On the corners, we chose to place one of the brackets all the way to the end, and then on the adjoining side, we placed the bracket several inches in from the corner so to ensure that the curtains would overlap in a sense.

My hubby sprayed paint all the pieces, conduit, and couplings.  Once dry, we joined the two pieces together with the coupling (which again is slightly off center from the center bracket), and placed them into the brackets.  Here's a picture of how the coupling is slightly off center from the center bracket.
Here's the first rod up with the curtain panels.
And here's what the corners looked like with the rods and curtains hung
Doesn't it look like the curtains overlap each other.  I am so happy with the outcome, and it just feels like I brought the indoors outside!


Tuesday, July 9, 2013

DIY Painter's Drop Cloth Curtain Panels for Screen Room/Patio

Since our screened-in deck was completed last fall, I've had the intense desire to make that room seem like an "indoor" room, but outside!  To complete this look, I knew curtains were a must have, but when I started to price out Outdoor Drapery Panels, the price was anywhere from $50-$100 a panel.  So, then I decided to price out buying outdoor fabric and making drapery panels, but that was rather pricey too, especially considering I would need a lot of fabric.  The panels would need to be about 8 1/2 feet long.  I also noticed that most outdoor fabric is guaranteed for up to 500 hours of sunlight, which isn't really that much.  I figured I would end up having to replace the curtains every summer if I went that route.  Then, I came across the idea of using painter's drop cloths as drapery panels.  They come in varying widths and lengths and they are very affordable.  They are made of canvas, so they are very durable and they can be washed and dried.

I was SOLD, so I went to Home Depot and purchased several, ten to be exact, drop cloths.  The only issue with the first two sets of drop cloths I bought was they had horizontal seams right down the middle of the panel.  My third and final attempt to find a drop cloth with NO seam, was a success.  I actually found a set of 2 drop cloths per package for $10.  They were 6 ft. by 9 ft. With permission from a sales associate, I opened the package before buying to make sure the drop cloth did not have a seam.  SUCCESS!  And, I couldn't beat the price of $5 per drop cloth. 


Initially I thought I would need ten drop clothes as I had planned to place a panel in each corner and then put two more panels in the center of each wall in my screen room.  I wanted enough drop cloths to be able to close them and block the sun out.  Though, after re-thinking that plan, I opted to just place panels in each corner, so two panels per wall.  The panels aren't wide enough, when pulled closed, to cover all the wall space, but I didn't really want the panels to obstruct our view of the backyard, and more importantly the pool.  See, I sit in this room while my kids swim, and I NEED to be able to see them while they are swimming, for safety purposes!  My hubby and I decided that we would just slide the two panels per wall along the rod to block out the sun where ever it might be!

I had also decided that I wanted to stencil the curtain panels once sewn.  I selected the Moroccan Dream Allover Stencil from Cutting Edge Stencils.  The stencil was $39.95, and I also opted to purchase the Clip on Stencil Level for $12.95, to ensure that the stencil would always be lined up correctly. 

I do not sew, well maybe buttons and small holes in clothing, but that's about it!  I really love the back tab feature on drapery panels, and decided that's what I wanted for these outdoor curtains.  So, I enlisted the help of my mother-in-law, who is a wonderful seamstress.  Before she began work on the panels, I first washed and dried all the panels.  Please NOTE:  Do NOT use liquid fabric softener when washing or a dryer sheet when drying them if you do plan to stencil your drapery panels.  The acrylic paint that you will end up using, will not adhere to the panels if you have used fabric softener of any kind.  Once dried, you will need to iron the drop cloths as they will be very wrinkled after having been dried. This is a bit time consuming.

Since the painter's drop cloths are already hemmed on all four sides, my mother-in-law, simply cut off the excess fabric from one end, taking into account a 1/2 inch hem and then a 3" rod pocket.  I needed my panels to be 8.5 feet long.  So, the unfinished length of the panel was cut to 102" long.  She allowed for a 1/2 inch hem, and a 3" rod pocket, which allowed for a finished length of 98.5 inches.  The difficult thing was each panel measured a different length once washed and dried.  So, she did have to measure the length of each panel in numerous places before pinning the hem, and rod pocket.  Now I know I said I wanted the back tab feature on the panels, which I did, but to obtain that look, it's necessary to make a rod pocket of sorts.  I found a great tutorial on how to make back tabs on your drapery panels, using grosgrain ribbon at Fiscally Chic Saving Money with Style.  I purchased the ribbon from Ribbons and Bows Oh My!  I choose the Oatmeal colored grosgrain ribbon.

 in 1.5" width and 20 yards, which was roughly $7.00.  They have so many colors available, varying width and lengths, and they are super affordable.  I would highly recommend Ribbons and Bows Oh My!  The great thing about using ribbon for the back tabs is you do not have to hem the sides, and the ribbon is very durable. 

My mother-in-law went to work, and made all 6 panels, using the grosgrain ribbon.  Once she returned them to me, I had to iron them again just to iron out the folds, etc.  Then I prepped the panels to be stenciled.  I did one panel a day. Each panel took me approximately 1 hr. and 45 minutes to set up, stencil, and then clean up.  I began by taking an unwashed drop cloth and laying it out on my hardwood floor in my living room (this is the most open, unobstructed area I have in my home).  I did this to make sure that any paint that seeped through the curtain panel would not go through to my flooring.  I took painters tape and taped that drop cloth to the floor very securely.  You do not want this drop cloth to be moving around once you begin stenciling.  Next, I took my actual panel and taped that down on top of the drop cloth that was taped to my hardwood floor.  I taped the curtain panel in several places to ensure that it would not move as I stenciled. 

Now, before I even began to do all of this, I had decided I wanted to paint the curtains with a fun, summery color.  I decided upon a "spa blue" color, as it really brought out the blue water in our pool that is situated just outside of the screen room. 

Calypso Blue by Folkart is the name of the color I used.  It  is an Acrylic Paint.  I found it at Michael's for .69/a bottle.   Now I had read that if you use acrylic paint on clothing or fabric, you should mix in some Textile Medium.  Textile medium helps to prevent the paint from cracking once washed and dried.   According to the directions you should mix 1 part Textile Medium to 2 parts Acrylic Paint.  After my first panel, I learned that each panel took 2 - 2 1/2 bottles of acrylic paint.  Since each bottle is 2 oz., I mixed 1- 1 1/4 oz. of textile medium to 2 - 2 1/2 bottles of paint.  I mixed this up in my painters tray, and used a dense foam 4" roller.  You can buy these at Home Depot for $5 or so. 

I measured the top width of the curtain panel and found the center.  I marked the center with a pencil.  I did likewise with the stencil, marking the center of that with a pencil.  I lined the center points up and then placed the level on the bottom of the stencil.  I then taped down the stencil to the curtain panel like such.


When stenciling, which this was my first time, according to the instructions you should load you foam roller up with paint, and then roll it back and forth on a paper towel so to absorb any excess paint.  This helps to prevent the paint from seeping or running once applied.  So, I did as was suggested and it worked relatively well.  Though, I will admit, as I did more and more panels, I didn't roll as much paint off the roller onto the paper towel as the color seemed to be brighter and required less effort to roll onto the fabric. I guess I got lazy!

Here's what it looked like once I got going:


The best thing about this pattern is that you don't see errors as readily, and trust me I made a few errors. Anyhow, I stenciled 6 panels.  Each panel seemed to take about 1 hr.  Though, I was stenciling these panels during my son's 2 hr. nap time, so I really only had time to make one panel per nap, with prep time and clean-up.  The only real pain was having to wash out the foam roller, paint pan, and the stencil.  I had to wash that in the bath tub, which was a bit time consuming.

Once I completed each panel, I allowed it to dry for an hour or so before moving it.  I then laid it over a couple of chairs to dry over-night.  About 24 hours after stenciling, I turned the panel over, and ironed the entire panel.  This is a necessary step as it sets the paint, so it won't wash out when laundering.

Here's a few photos of the end result.  Stay tuned for a tutorial on making your own inexpensive, drapery rods, which is how we hung these panels in our screen room.


Once this room is complete I will be glad to give you all a run-down of what I did, where I bought it, and/or how I achieved the look!

**UPDATE** Well, last week I noticed that two panels had started to develop mold/mildew on them, so I threw them in the washing machine on my "deep clean" cycle, which is super hot water.  Well, the mold/mildew remained after two washings, and the curtains shrunk A LOT, and one panel faded a lot.  So, what I have learned, WASH the drop cloths several times on the hottest water setting your washing machine has.  I had to re-paint two new panels, which I was not happy about.  BUT, I did learn once a couple more panels developed mold/mildew, pour clorox bleach directly onto the mold on the back side of the curtain. It kills the mold!   Throw the panels immediately into the washing machine on a hot water setting.  The mold came out and  the bleach did NOT fade or bleach out the panel.  I did notice, that these panels shrunk some, and I didn't dry them in the dryer.  I actually hung them back on the curtain rods and let the sun and wind dry them.  So that being said, again wash the painters cloths 2-3 times and then dry them on a hot setting before making them into drapery panels and then stenciling.  Learn from my mistakes!!!

Tuesday, July 2, 2013

DIY Upholstered X-leg Benches

My hubby and I decided to finally move forward with a DIY project we have been wanting to do.  I was so inspired by a tutorial over at  Chronicles of Home on how to make an x-leg bench.  It's a great, detailed tutorial, and exactly what I was envisioning for my living room.  My living room is a bit on the formal side, so I wanted to dress the x-leg bench(s) up a bit!  This was my inspiration:
 
Source:  House Beautiful
 
Aren't these just beautiful!  They are so rich, and I knew they would look lovely in my living room, which has chocolate velvet curtain panels, and rich burgundy, black and gold accents.  The first step was to determine the height, length and width.  Jennifer over at Chronicles of Home made her x-leg bench 17" square, however, I wanted mine to be rectangular as opposed to square.  So the dimensions I settled on were 17" deep x 22 inches long x 17" high.  I also wanted two benches, just like the photo above, so to pair them together.   
 
So, we basically followed the tutorial, except we made the bench slightly longer, which doesn't change the angles or measurements given over at Chronicles of Home.  The only change would be the long piece that connects the two X's together at the center.  More on that in a bit!
 
My hubby sketched out the plan on paper and then took a quick trip to Home Depot.  He ended up getting six 10 ft. lengths of maple 1x2's.  We opted to get maple as it's a great hard wood, but you could also get it in other wood grades.  What you choose will determine the cost.  The maple was a bit pricey! 
 
Here are all the pieces cut.  


Next, sand down all the pieces!  Then place one of the longer pieces on the ground, and lay one of the shorter pieces on top, making sure to line up the ends, and ensure that the angles are going in the same direction.  Apply wood glue to the bottom side of the smaller piece and press into place on top of the longer piece, making sure everything is perfectly aligned.   
 
Lay another long piece on top, perpendicular to the shorter piece.  Again, gluing those pieces together and aligning them properly.  Wipe off any excess glue and after 15 mins. or so check them to make sure everything is still aligned. 
 
Do this same thing with the other two long pieces and the short pieces. Let the glue set up for 30-60 minutes, then carefully turn the glued X's over and follow the same process with the remaining four short pieces. They should look like this.
 

My hubby used clamps to keep the pieces in place while the glue dried.

Viola!
 
Next, you must put a touch of glue in the center notch where the two pieces fit together. Let the glue completely dry, then hammer three 1 1/4" finishing nails down each length of the shorter pieces.


Now, here's where I deviated a bit from the tutorial over at Chronicles of Home. If you remember my inspiration piece: 


You will see the beautiful gold accents on the legs and then the gold that wraps around the base of the cushioned seat. Well, to get that look, my hubby used his router along the outside and inside edges of the X-legs, front and back, to create an indentation (a guide, if you will) for me to paint gold. He used a 3/16th inch beading router bit. The only area he didn't router was the top of the X, closest to where the cushioned seat would be.


Doesn't that give it such a beautiful, finished look!

As you can see from the photo below, we then put some wood putty over the nail holes, allowed that to dry, and then sanded them down.


Before we went any further, we spray painted the  X legs with Rustoleum's Oil Rubbed Bronze.

 
Next, we cut our center piece, which connects the two X-leg bases together.  Remember, you need to cut two pieces and glue them together, much like we did the X-legs.  We cut these pieces 17 3/4 inches long.  I had mentioned earlier that the length of this piece did differ from the dimensions given at Chronicles of Home, because we opted to have our benches be longer than 17". To achieve a 22" long bench our center piece, again,  was cut at 17 3/4" long.   Once cut, we glued both pieces together, waited for the glue to drive, then nailed it several times, and puttied over the holes.  Once dry, we spray painted that with Rustoleum's Oil Rubbed Bronze.  Once dry, lay one of the X's on the floor and put a dab of wood glue in the center. Position the center piece in the center, upright, and let it dry for 30-60 minutes. 
 
When we did this, the glue was unable to actually hold the center piece in place.  My hubby ended up driving a screw right in the center of the X from the outside, on both X's, to hold the center piece in place.  We wondered if the glue didn't adhere/hold the center piece due to the fact that the wood had been painted.  Perhaps, if we were to do this project again, we would wait until the legs were fully assembled before painting them.  We puttied over the screws and spray painted once again, and then used Rub-N-Buff in Gold Leaf to paint the areas that were routered.  I found it easiest to use a very small and fine, yet somewhat stiff paintbrush to paint the routered areas.  Here's how they looked after that step:
 
 
If you look at our inspiration photo, you will notice that those benches have a wooden piece, painted gold,  between the X-leg base and the upholstered seat.  This wraps all the way around the seat.  To achieve this look my hubby cut two long pieces of 1"x 2" that were 22" inches long, and then two pieces that were 17" inches long.  All of them were cut at 45 degree angles.  He then glued them together like a picture frame.  He has a picture frame clamp that works well for this step.
 
 
Here are all the pieces painted:


Since I wanted the sides of the "picture frame" to be gold, I used, once again, Rub-N-Buff's gold leaf paint. 
 
I tried applying it with my finger, which according to the directions, is preferred, but I found the paint brush, worked better, and was a lot less messy.  Allow for drying time in between, and then re-apply as many coats as is needed to cover the area.  I think I painted 3 coats, and once the final coat was dry, I buffed it to get a shiny finish.  The tricky part was ensuring that you didn't get any of the gold paint onto the Oil Rubbed Bronze Paint applied to the rest of the X-legs.  I would be lying if I didn't admit that I had to do a few touch-up jobs, a few times, both the gold sections and the Oil Rubbed Bronze areas.  It would have been easier to touch up the Oil Rubbed Bronze if it hadn't come from a spray can.  I think, in the future, I would either paint the legs with reg. paint or stain them. 
 
 
F.Y.I., you will want to apply some of the gold paint along the top of the "picture frame", as you want to ensure that none of the oil rubbed bronze paint shows through once you place the upholstered seat on top.
 
 
Once this was complete, the final step was to upholster the seat.  We began with a 3/4" thick piece of plywood.  Cut it 17" wide by 22" long.  Then I purchased a 4" thick piece of foam.  I made sure to buy a very firm piece of foam, where this was going to be a seat.  A little helpful hint.........denser foam is easier to upholster, as there is less give!   We cut the foam to the same dimensions of the plywood.  I then laid batting down on the floor, cutting that to be about 10-12 inches wider and longer than the foam and plywood, to allow you to wrap the batting around to the back side of the plywood and staple it. 


The next step was to cover it with a fabric of my choice. The hardest part for me was to find a fabric that I really liked, and one that would look nice in my formal living room.  I ended up with a chocolate brown, suede-like fabric that I found at Joann Fabrics, for like $8/yd.  I only needed 1 yard of 54" upholstery fabric.
 
I wrapped the fabric around the cushion, much like I did the batting.  I didn't think to take pictures of that step, but Jennifer over at Chronicles of Home gives an excellent and detailed tutorial on how to upholster the seat for this bench, so I won't bother and replicate that. Check it out. 
 
 Anyhow, once the cushion was upholstered, we turned the bench on it's top, with the cushion on the floor, and my hubby drove screws through the picture frame into the back of the plywood.  Make sure it's lined up well before screwing it!
 
 
As you can see, he had a little helper.  My youngest is obsessed with power tools.  No worries, there's not drill bit in the drill!
 
Here's the end result.....what do ya think????


Thursday, May 23, 2013

One Year Anniversary and Antique Serving Table Makeover

I can't believe it, but a year ago today I created my very own blog, and  posted for the first time EVER.  Five-thousand three-hundred page views later, I'm still blogging, and enjoying it very much!

OK, OK, on to the Antique Serving Table Makeover....The older I get the more I have developed a true love for antiques!  It wasn't but just a few years ago, that I wanted only "new" things.  But, since that time, I have acquired a few pieces of antique furniture that were passed down to me.  One was my grandmother's desk.  I acquired this piece as a child, actually, but never really appreciated the value of it, and I'm not talking about monetary value, until just recently.  My hubby had the desk refinished for me several years ago, and every time I walk past that desk, I think of my grandmother, who gave it to me, and has since passed away.


I also received an antique chair.  It was in really rough shape.  My mother actually had it stored in her attic, and gave it to me, again, a few years back.  The chair was actually my great-grandmothers.  With limited reupholstering skills, I decided to let the professionals re-upholster the chair, and now it sits in my formal living room.

 I actually found a seam-ripper in the cushion of the chair...my grandmother was quite a seamstress.  I can envision my great-grandmother sitting in this chair, mending clothes!  These two pieces have great sentimental value, and I can't help but think how proud my great-grandmother and grandmother would be to see these two pieces of furniture in my home! 

About two months ago, I received a telephone call from my youngest brother!  He and his family currently reside in my paternal grandparents old home.  When my grandparents passed away, their house became a home to a few different family members.  To make room for their belongings, my grandparents things were stored in the upstairs bedrooms and the eves.  Well, my brother is trying to clean things out, and he wanted to know if there was anything I wanted of my grandmothers.  With my new found love of old, sentimental things, I said I would be up to check things out, and that I did.  I snagged a beautiful, old, serving table, a plant stand, and an occasional table.  They all appeared to be antiques, and there was just something about each and every piece that I loved.  I loaded my vehicle up and began an immediate makeover on the serving table.  It had been stained dark brown, but the finish coat appeared to be in really bad shape.


Where it had been stored in one of the upstairs bedrooms, where there's no heat during the winter months, and really hot in the summer months, I think this really affected the finish coat.  Otherwise, the table was in great shape, with few imperfections.  I decided that I wanted the serving table to sit in my formal living room, just beneath an over sized, framed painting.  Since I have accents of black throughout that room, I decided I would paint the serving table a beautiful black.

I began by taking the doors off and the drawers out, then removed all the hardware.  I stored the hardware in a special place as I planned to reuse the hardware. I then began sanding.  I primarily used my hubby's palm sander, and occasionally a block sander.  Here's what it looked like after I had sanded it all down.

 I then primed the entire piece using a small roller for the flat surfaces and a Purdy angled brush for the inside of the cabinets and the turned legs.  I happened to have white Kilz stain-blocking primer on hand, but I should have gotten grey primer, as that's preferred when you are painting a color as dark as Black.

I gave the table two coats of primer, and then headed to my local Benjamin Moore retailer and bought a quart of Advance black satin  paint, or so I thought.  When I got home, I opened the can of paint and started to stir it, I noticed that the paint looked dark gray not black.  In fact, the paint residue on the lid of the can even looked gray.  Trying to remain optimistic, I began to apply the paint to the table,  but it appeared dark gray in color.  I thought that perhaps it looked gray because it was going over white primer, so I applied one full coat to the table.

 Then re-applied a second coat a day or so later.  IT WAS STILL GRAY in color!  I decided to bring my little quart of paint back to my local retailer and see what they could do for me.  They willingly gave me a credit for that can of paint and mixed me up a new color, called "BLACK".  Again, the paint in the can appeared gray, but the stir stick, once dried, appeared black, so I figured I would try it.  Again, I applied two full coats of the "Black", and after it dried, it still looked like a charcoal gray.  At this point, I was more than frustrated.  Even though I love Benjamin Moore Advance paint, I opted to go to Home Depot and buy a quart of black satin paint off the shelf.  It happened to be Valspar. When I opened the Valspar paint, it was without question, BLACK!  I was so excited.  I lightly sanded down the surface of the table, and then applied the black valspar paint.  It looked great....until I got to the top of the table.  For some reason, even though I was using the same roller, once the paint dried, you could see the overlaps of lines created by the roller.  I sanded the top down several times and tried to paint the top with the smaller roller, and even tried using a full-size roller, but both kept leaving lines.  At this point, I seriously could have thrown something, anything!

After multiple tries and failures, I convinced my hubby to spray paint the top, just the top of the table with Krylon Black Satin Spray Paint.  He was gracious enough, and after several coats (sanding in between), the top of the table looked flawless, and it matched the Valspar Black Satin Paint pretty well.

Before moving onto the finish coat application, I decided to paint the detailed scallops on the doors and drawers with Rub 'n-Buff in gold leaf.  If you've never heard of or used Rub 'n Buff, the product is amazing.

It's a wax metallic finish, that can be used on nearly any surface.  It comes in 1/2 fluid ounce tubes, and in a variety of metallic colors.  I love the gold leaf, and had it left over from another project I had done so I used that!  It's readily available at craft store:, AC Moore, Michaels, etc. and cost all of $4-5.  Despite the size of the tube it comes in, it can paint a lot of area. You simply rub the product on, and once dry you buff it, and it leaves a shiny, metallic finish!

I then bought a very small, thin, angled paint brush from AC Moore, so I could get the paint into the fine lines of the scallops.


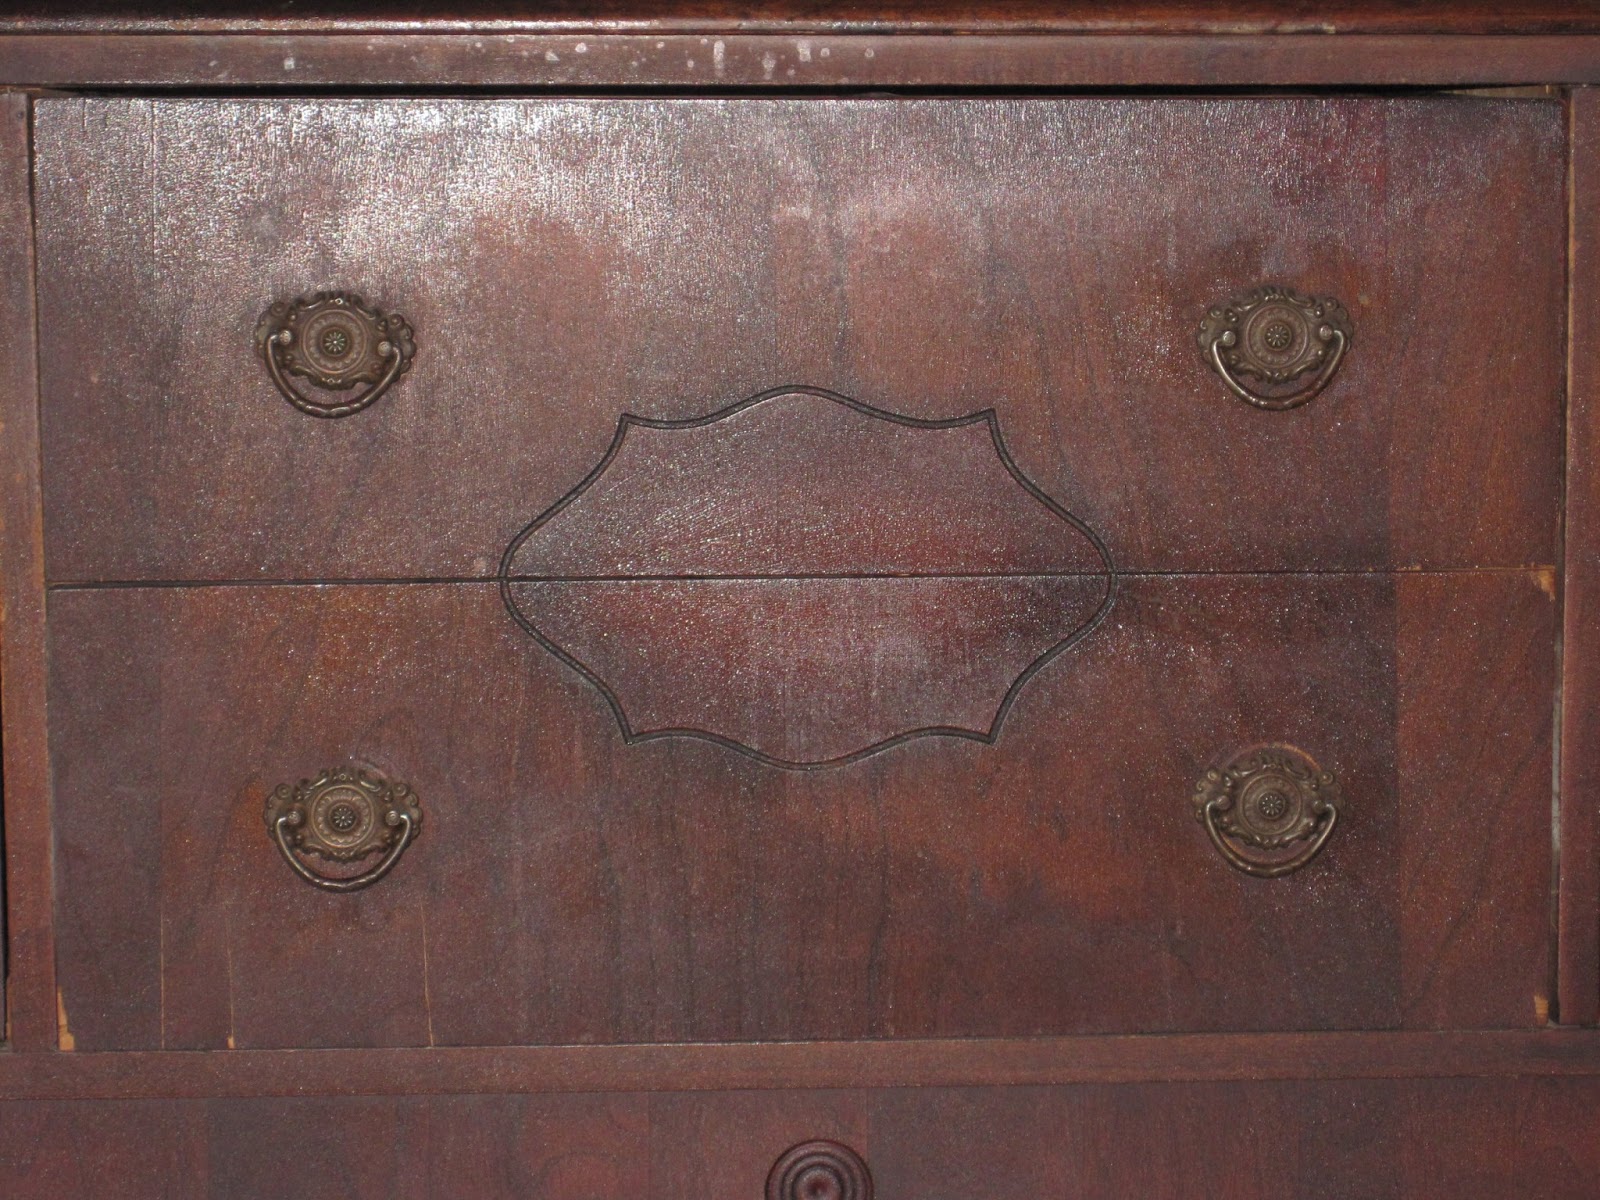
 Here are the before photos of the serving table, notice the scalloped areas on the doors and drawers.


Here's what they looked like after 


Finally, it was time to paint the finish coat.  We opted to use Minwax Polyacrylic, as it is water-based, and the Valspar paint I had used was water-based.  Now, I have to admit, I have never used Polyacrylic before.  It is very milky in appearance, and when it goes on, it looks milky, but as it dries, it dries clear.  Well, the first coat I put on, I put on WAY TOO thin!  It said to apply thin coats, but I put it on so thin, it didn't even cover in all areas.  I started to freak out once I saw what it looked like once it dried.  My hubby assured me that we just needed to sand it down and apply the poly a bit thicker, so to ensure even coverage.  I decided I would let him deal with the polyacrylic, so he put the top coat on with a nice Purdy nylon brush.  Once it dried, though, there were still a few spots that didn't get covered, so we sanded it down again, and re-applied another coat.  We did this four times, and by the fourth time, we started to get bubbles which dried in place and made the surface bumpy.  At this point, my husband was ready to send the table away, and I was feeling pretty discouraged.

Then, I had a thought, FORGET the polyacrylic, it was too temper-mental for our taste, let's use Satin Clear Finish Spray Paint by Krylon.  For $3.24/a can, as compared to the $17/ a quart for the polyacrylic, I figured we didn't stand much to lose.  I actually bought three cans of the Finish Spray Paint so to ensure we had enough.  Before using this, I prepped the table, by ONCE AGAIN, sanding down the entire table.   My hubby then applied several coats of the Clear Finish Spray Paint, and it left this white, hazy film all over the table top.  I'm guessing, that in order to use this product, you must use it directly over a  freshly painted surface.  Where we sanded the surface before applying it, we think this messed it up.  SOOO, my husband decided he would sand down the entire top of the table, right down to the paint, and then attempt the polyacrylic, once again, but with a new Purdy nylon brush.  He did, and after several more tries it came out fine.  It's not perfect, but I think if we expended anymore time on this little project we would have harmed this lovely piece of furniture. 

The last and final step was to paint the hardware, as it was in really bad shape and was very dingy looking.  I used the Rub 'N Buff, in gold leaf, once again.  I applied it with a small paint brush, all over the door and drawer pulls.  Once dry, I buffed them all.


Then I painted the hinges and screw heads

Finally, I screwed in the pulls on the drawers and doors, and the hinges onto the door, and then onto the table.  Here's the finished product