Pages

Tuesday, June 10, 2014

Craftsman Molding for our not-so-little girl

Hello there!  Once again, it has been awhile since I last posted.  Trust me when I say, it's not for lack of projects!  For about four weeks back in April/May my hubby and I took on the job of repainting our daughter's room. At first, we thought we would just paint the walls, as our almost 8 year-old didn't like her two-toned pink anymore.

  She wanted something a bit more mature and indicated that she wanted her room to be turquoise.  Well, since we had only painted her walls pink 3-4 years prior, I thought it would be best to pick a neutral paint color for the walls, and add the turquoise color, either by way of her bedding or accessories.  My daughter was fine with that idea, and I felt good about the fact that I wouldn't need to repaint her walls in a couple years time.  We decided upon a very light shade of gray.  In fact, the color is Benjamin Moore's Marilyn's Dress, with more black added in to darker the gray a tad.  I didn't want a gray with any undertones, so the make-up of Marilyn's Dress is literally white with some black added to it.  This subtle shade of gray would compliment just about any accent color, especially turquoise.

Our daughter's room had a chair rail (in the photo above you can see where the chair rail was located), and I decided that I didn't want that up anymore, so my hubby tore it off the wall, and once that was down, I thought, "What better time then now, to update/change all the trim in the room."   You see, all the woodwork in our home is stained a bright cherry color.  Though, I still LOVE that cherry stain, I was ready for something different....something brighter.  So, I convinced.. yes, convinced my husband that it was a good idea to replace all the moldings in my daughter's room to a white trim, baseboards included.   It was also a great excuse to make "craftsman molding", which I have been drooling over ever since I read the post over at Thrifty Decor Chick, on how to make your own Craftsman molding.  Here's what I'm talking about

replacing skinny door trim

My hubby bought all kinds of pine boards (1x4's), along with other lumber per the instructions provided at Thrifty Decor Chick for the door and closet, and then followed the DIY tutorial at Thrifty Decor Chick for the window.  Tearing off all the trim around the window, door and closet, saved me a lot of time priming and painting over our existing trim.  However, the interior of all the windows in our home are wooden, so I had sand, prime and paint over all the cherry stain, and lather, rinse and repeat for the door and closet door.  Believe it or not, I applied two coats of stain-blocking primer, and then painted nearly 5-6 coats of paint just to cover the cherry stain.  I used Benjamin Moore Advance in Semi-Gloss.  It's an Alkyd-based paint, and is ideal for wood trim.  It's super easy to work with and apply, but after this experience perhaps the coverage isn't that great.  The color is Simply White.  Though, I did have the folks at Aubuchon Hardware, add a bit more white to the Simply White formula, as it wasn't as bright as I had envisioned.  I am so visual, it's not funny!  Now I realize that I personally love the stark contrast of bright white against nearly anything, so WHEN I get brave enough to redo the trim work in my boys' room, I will get a stark white, probably right off the shelf.  

My hubby filled all the holes left after tearing the chair rail off, and sanded the area once it had dried.  He then primed all the walls, and painted them. While he did that, I painted all the trim boards and molding (craftsman and baseboard).  We then adhered the trim to the wall with hubby's nail gun, which worked like a gem!

 Of course, I now want to do this in every room of our house, but it truly is a very time consuming project.  It's also a hard one to justify when all the trim in our home is in near perfect condition.  But, what a huge difference it has made in our daughter's room.


Remember the before  

And the after   

I love the subtle, cool gray walls against the soft white trim.  Now, I must get busy with "decorating" the room.  My daughter has picked out a lovely, contemporary aqua and white comforter set, so we will build on this and will keep you all posted!

Tuesday, April 29, 2014

Turning a Guitar Into Wall Art

Hello there!  It's a damp, cloundy day here in New England...perfect day to sit down and blog about one of my latest projects!  I've been working on the finishing touches of my boys' bedroom, and really wanted to incorporate my oldest son's very first youth-sized electric guitar into the room.  Since my son recently purchased a full-sized guitar, of which is sitting in his guitar stand on the floor, I thought it would be a neat idea to turn his old guitar into wall art.

I happened to stumble upon the perfect solution over at Amy's Casablanca.  It was exactly what I was envisioning


Courtesy of Amy's Casablanca

So, I hopped into my car and headed to Home Depot to buy several fence pickets.  Now, I learned the hard way, fence pickets are a "seasonal item", so they didn't become available at my local Home Depot until the first of April.  The pickets were only 3" wide, but they were 6 feet long.  It's helpful to know the dimensions of your guitar, which I did (I'm surprised I remembered to do this step, actually) before you go to purchase your pickets.  I knew the length would be more than adequate, but where the pickets were so narrow, I knew I would need several, so I  bought six of them, to ensure enough width for the guitar and then a little extra on each side of the guitar. One picket was for the back...to hold all the pickets together (more on that later).  The pickets were not in great shape. We had to look each picket over really well, as many of them have a lot of imperfections.  The pickets cost all of $1.68/a piece.  While at Home Depot, I also purchased a small sample size of Glidden paint, to paint the pickets. The test size is perfect for small little projects like this.  It cost all of $5.   I opted to get a gray color called Dolphin.

Since I'm not comfortable using my husband's saw, I asked him to take over and cut the pickets down to size.  He began by lining them all up and cutting off an inch or so on the bottoms, just to give them a straight, perfect edge.  He then cut off the tops.


The dimensions we ended up with were 17 inches wide by 42 inches long.  As you can see from the above photo, we used five pickets across,  We took the sixth picket, cut the top of the picket off, and then cut that piece into three smaller pieces.  The length of each piece was just shy of the total width of the five picket, roughly 15 inches long.  To get the pickets to adhere, my hubby placed the three pieces horizontally across the back:  one near the top, middle and bottom, as such:
and then used screws to screw the horizontal pieces to the vertical fence pickets.  Make sure not to use screws that are too long as they will poke through to the front side.

Our horizontal planks weren't aligned perfectly, but that was my fault, as I thought my hubby had initially made the planks too long in proportion to the guitar so he just cut off one end to give me the desired length I wanted.  Otherwise, they would have been perfectly aligned...OOPS!  Thankfully, you can't see this!

Hubby then used his key-hole router bit, and routed an area on the top horizontal piece to allow for us to hang it on the wall.  Two nail heads fit perfectly in the key-hole opening!

The next step was to paint it.  I wanted a rustic look and feel, so I didn't sand the planks much.  And, when I painted, I only put on one coat, as I didn't want full coverage.


The next step was to adhere the guitar hanger.  This little hanger was very inexpensive.  I think I paid $4-5 on Amazon.

It came with screws, so we laid the guitar on the planks and positioned the hanger where we thought we wanted it to be placed.  My hubby then screwed the hanger to the fence pickets, and we placed it on the wall with two nails, which again fit right into the key-holes hubby had routered.  Here's the end result!


And another shot  

Here's a side view  

A really simple project, all for less than $22!  I couldn't be more pleased with how it turned out and my son loves it.  What more could I ask for!

Sunday, March 16, 2014

Desk Makeover

Hello there!  It's been awhile since I last blogged....November was it!  I always seem to take a break from the blog world over the Thanksgiving and Christmas holidays, but I really don't have any excuse for not writing in the months of January and February other than the sheer lack of desire.  YUP, I said it!  I just haven't felt inspired to share much, and truthfully, I haven't done much in the way of projects around my home.  But, that's what I love about having a blog, I can write when I feel inspired, and with Spring on the horizons I have been feeling a bit more motivated to tackle some projects.  I actually started a small project the very end of December, but it took me a couple of months to finish it.  My 7-year-old daughter had been asking for a desk for her bedroom for awhile now.  I am a sucker for antique furniture, and I really had a vision of what I wanted the desk to look like, so my search took awhile.  But, I finally found THE desk at a local antique shop.  I wanted a solid, hardwood desk with drawers on both sides, but on the smaller side as my daughter's room isn't all that large. When I say smaller, I'm speaking more to it's depth than to it's length.  I paid all of $65 for it.  The antique shop I purchased it from typically spray paints all the furniture they sell.  This desk had been painted an antique white/tan color, but it hadn't been repaired, as there were multiple places in which the wood had cracked, and two of the legs had been damaged and repaired by nailing on a block of wood.  Here's what it looked like once I sanded it all down.


I should mention that I before I sanded it, however, I removed all the drawer knobs and placed them and the screws used to secure them to the drawers in a baggie.

I couldn't stand the block of wood that had been nailed on to replace two of the adorable feet, so I sent the desk to a gentleman that lives locally, who repairs and restores antiques.  He was able to fix the feet and a few other issues, and then I began sanding!  I wish I had taken a photo of the hideous block feet, but I was just so eager to get that fixed I didn't give it any thought to take a picture of it!

I began by using my palm sander, sanding the entire surface of the desk:  drawer fronts, sides, top, etc.  Once that was done, my hubby got his compressor out and sprayed the whole desk down to free it of dust and debris.


Then I began to fill all the cracks by using Elmers Wood Fill.  With some of the cracks, I had to fill them a few times, allow to dry, and then sand again.  I had to use a lot of wood putty, as there were a lot of cracks to fill.  I started out using a small putty knife, but actually found it more effective to use my finger and apply it that way.  I just felt like I had better control.  Once the cracks were filled, I allowed the putty to dry and sanded down all those areas, with my mouse sander, when able and a sanding block on hard to reach areas.  Here's a look at the desk with the various cracks filled and sanded.


Once the patching was complete, I used a dry cloth to wipe the desk down to ensure there wasn't any dust on the surface of the desk.  Then I used the Kiltz Oil-Based Primer I had on hand to prime the entire desk and drawer fronts.  You will notice in the above photo, I placed the drawers face up so I could prime those, as well. I used a brush for the small areas, and a foam roller for the larger areas. You will notice we placed the desk on its top to make it easier to prime the legs.


After the first coat of primer, I allowed it to dry and then sanded it all down.  I applied a second coat of primer to ensure even coverage and sanded again once that coat was dry.  You can see in the photo below how well the primer covered after a second coat.


Here are the drawer fronts after two coats of primer.

The next step was to start painting.  I wanted the desk to have an antique white finish, as much of the bedding, etc. in my daughter's room is off-white.  I knew I wanted to use Benjamin Moore's ADVANCE line. It's an alkyd based paint (water-based) so clean-up is really easy, and when it dries it drys to a hard finish.   I have used this paint on other pieces of furniture and really like how well it covers and ultimately what the finish coats looks like.  I ended up choosing Cloud White OC-130, but had them add 1.0 more yellow to it (by the way I bought the pint size in a Satin Finish).  It was a soft cream color, just beautiful.

I applied the first coat, again using a Purdy brush to cut in the edges and hard to reach areas, and then finished off with a small 4" foam roller for all the larger areas.  The foam roller works so great on wood furniture, and leaves a flawless, smooth finish.   I allowed that coat to dry and then sanded the entire desk down and applied a second coat.  Since there were so many areas that I had put wood putty, I decided to put a third coat on.  I know the third coat was probably over-kill but honestly it didn't take much time at all to paint the entire surface and drawer fronts.  We then flipped the desk upright, and gave the top three coats of paint, in the same fashion.  After the third and final coat of paint, I did sand the top down, as my hubby and I had decided that we would put a polycrylic on the top of the desk to protect it, especially where my 7-yr-old would be using it.  My hubby applied multiple coats of Minwax Polycrylic (a water-based poly urethane).  I have a love- hate relationship with Polycrylic, as it's difficult to get an even, flawless finish even after multiple coats, but you would never know the finish wasn't perfect unless you look at it in the light, with your head tilted to the side at a 40 degree angle :)  Please note you must sand between each coat, but DO NOT sand the final coat as it will dull the sheen, which we used a Satin Sheen.  

Since the drawer knobs had also been painted, I sanded those all down, primed and then painted several coats of paint on those.   I'm pretty satisfied with the end result, though now that my daughter has her "new" desk she thinks we should redo her room from the paint on the walls to the textiles on her bed!  OH BOY!  Why do I sense that I'm going to end up painting the desk a bright white!


Let's look at how it looked when I started this little project
BEFORE
AFTER


Tuesday, November 12, 2013

Spice Drawer FINISHED

Hello there!  I hope you all had a wonderful Veteran's Day weekend!  I did some of my first real Christmas shopping of the season this past Saturday.  Every year, my two sisters and I go with our Mom to help her get gifts for the grandchildren, in-laws, and of course her children!  It's a fun, LONG, day of shopping, but it's come to be one of those traditions I really look forward to and ultimately enjoy!

OK, so I have deviated.  I guess the reason I was sharing all that was to say that my mind is now wrapped around the upcoming holidays, and not so much on DIY projects around the house....BUT, I was able, with my hubby's help, to finish my spice drawer.  A few weeks ago, I shared how I converted all my mix-matched spices into a uniform look with spice jars from World Market.  You can check out that post: Organizing Your Spices.  Well, we had this vision of placing all the spices in a drawer, neatly organized, so you could easily read the labels affixed on top of each jar, and readily access each and every spice.  Let's just say, that was not the case prior to this little project.  I had spices stacked atop spices.  I would have to take 5-10 spices out of my cabinet just to find the spice I needed.  Well, NO MORE!

You would think it would have been as simple as transferring the spice jars from the cabinet to the drawer, however, if you really think about it, the jars would just slide around in the drawer when opening and closing it, and then there would, yet again, be disorganization.  Well, we have to thank Rodney!  Rodney is my friend Missy's husband.  If you remember, I introduced you to Missy  in that post about organizing your spices. Rodeny had the clever idea of creating a base with holes cut out for each jar, which would eliminate them from sliding all around.  So, my hubby began making this "base" while I was shopping on Saturday.  Isn't he sweet!

He found a small piece of plywood, 3/4" thick, left-over from another project and cut the plywood to the dimensions of the interior of  the drawer. Since all drawers are not created equal, well they often measure at different lengths and widths, and even depths, it's probably not overly important that I share the dimensions of my drawer. However, before you begin this little project, please make sure that your spice jars are the correct height to stand upright in your drawer.

Next, measure the base of the spice jar so to determine what size to cut the holes for them to then sit in.  My jars were roughly 1 3/4" in diameter  My hubby decided to cut the holes 2" in diameter.  After some fast calculating, he determined that he would be able to fit five holes across the width of the plywood, and 7 holes deep, leaving me with 35 holes for 35 spice jars.  Before he began, he marked the plywood as to where the holes needed to be drilled.  He didn't have a 2" hole saw for his drill so he had to buy one, but I think it cost all of $13 at Lowes!  He did share that it is a bit time-consuming to cut the holes.  Here's the base with all the holes cut


Now, here's a couple of things we learned along the way:  we could have fit 6 holes across the plywood, but there would have been a very thin piece of plywood between each jar.  My hubby thought it would be a bit more rugged if he left more spacing between each jar, but that was his preference!  The other thing we learned is, your drawer doesn't come all the way out, so the last row of holes isn't really necessary as you can't access them as easily.  Thankfully, I only have 30 spices, so I told my hubby not to bother and drill the holes in the last row.

It fit into the drawer perfectly!

The next logical step is to begin placing all your spice jars in the holes, but not for me.  You see, when I put the labels on top of my jars, I never did anything to seal or protect the labels, they are only paper!  So, my friend Missy had suggested I put Mod Podge over each label.  So that's what I did, with the help of my 10-year-old son, and a small foam brush!  The Mod Podge actually dries clear, and now my labels are all sealed!


 Here's a couple of different views of my "new" spice drawer!


I love how they look in the drawer, but better yet, I love that I can read all the labels and readily access any spice whenever I may need it.  It's really the simple little things like this that make our lives a bit easier!

Once I cleaned out all the spices from my cabinet, well, I then had to reorganize it.  Remember what it looked like before this little project

BEFORE
AFTER

It's a little bit better.  I hope to get some canisters for my counter tops for my flour, sugar, etc. so that will free up a bit more space in my cabinet and look a bit tidier!  

Are you working on any projects to help de-clutter and organize your life?  Please do share!


Tuesday, October 29, 2013

Adding a Decorative Touch of Color

In the midst of all my fall nesting, I did manage to create a couple of inexpensive decorative objects to add to my Master Bedroom and my boys' room.

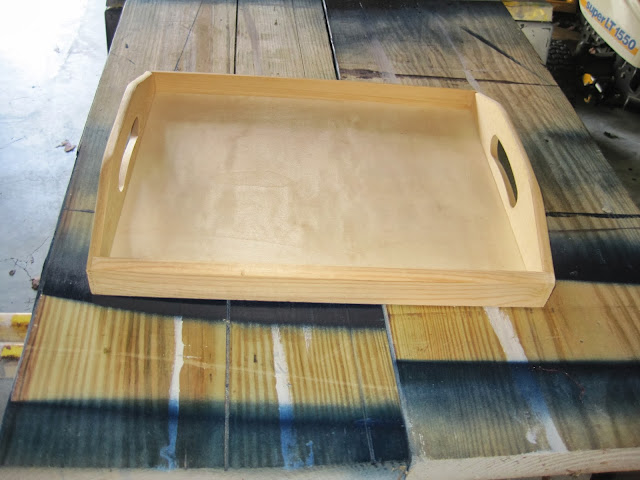
Sometimes these small little touches can make an otherwise ordinary room, a truly fabulous one.  As I've mentioned in prior posts, I've been remodeling my bedroom, and recently started on my boys' bedroom.  For my room, I wanted a pop of the same blue that I had used on my Night Stands, Benjamin Moore's Wedgewood Gray, on my dresser!  I love the versatility of a serving tray. You can find them almost anywhere.  T.J. Maxx always seems to have some really adorable ones.  However, because I wanted a certain color, I knew I would need to paint the tray.  Well, I happened to stumble across some unfinished, pine trays at A.C. Moore, during one of my last visits.  There were various sizes, and styles.  They even offered a tray with folding legs!  The price for the tray.....$5.99, and with my trusty 40% off coupon, I snagged it for just over $3.00.  It's nothing too fancy, but exactly what I was looking for.


It actually was sanded fairly well, so I just took some fine sandpaper and sanded any areas that might have felt rough to the touch.  Since the tray had never been stained or painted, I didn't feel the need to use primer.  I simply took out the left over Benjamin Moore paint I had from my night stand project and began painting.  I used a small angled brush to paint all the corners, and sides, and any other small areas that a roller would not fit.  Then I used a small foam roller to apply the paint to all the other flat surfaces.  I applied two coats for good coverage, lightly sanding between coats.  Here's the finished, painted tray

And here it is on my double dresser in my bedroom.


I haven't quite decided what I should put in the tray.  But I just love that little pop of color that is carried throughout my entire bedroom.

But, I didn't stop there...oh no, I mentioned that I added some accents to my boy's bedroom.  Well, when I was cleaning and reorganizing my hope chest, I found several old picture frames.  I found two identical wooden frames, that were sized for 5x7 photos.  Well, no more than a month ago, we had my cousin, who is a very talented photographer, take our family portraits.  I love to use photos as art, and when decorating.  So, I purchased a 5x7 print of each one of my boys, individually, painted these two wooden frames and placed them in their bedroom.

Here's what the frames looked like before I transformed them
 They were actually olive green in color.  Well, my sons' room contains a lot of Navy Blue, so I thought I would paint them navy.  For this small project, I knew I didn't want to spend for a quart of navy blue paint, so I took one of my son's shirts (which was the exact navy blue I wanted) to Lowes.  They scanned the shirt and color matched the paint to the shirt.  I actually purchased a sample size of Valspar paint for $4.  This is an excellent alternative, if you only need a small amount of paint.  It was more than enough paint for these two frames.  I simply sanded the frames down to take off the polyurethane, and then began painting.  Again, I used a small angled brush to get the paint in all the nooks and crannies, and then went over everything with a small foam roller.

I applied 2-3 coats of paint per frame.  Again, I opted not to prime them first, as I was going much darker with the paint color than what was already on there.  I'm pretty happy with how they came out and they add, again just a nice pop of color and a really nice decorative touch to their bedroom!


Really quick and easy to do.  And, it only cost me $4, plus the cost of the prints!

Monday, October 28, 2013

Organizing Your spices!

Good Monday morning, everyone!  Well, the weather is getting much colder up here in the Northeast!  Just waiting to see the first snowflakes of the season fall, well I'm not anxiously awaiting or anything.  But, with the colder temperatures its only spurred me on to continue with this whole fall nesting thing.  This is all new to me, usually I get Spring Fever and clean all the time, but this Fall I just can't seem to get organized enough.

On to the next task.....tackling my spices.  My spices have always been stored in a cabinet in their original containers.  I really wanted some uniformity and better label system.  Take a look at what I'm talking about


Now most of my spices are located on the bottom shelf, but it just looks so cluttered and disorganized.  Okay, so the whole cabinet does!  But for now, I'm focusing on the spices....one thing at a time, right!  So, I started my search for the perfect spice jar, and ended up finding exactly what I was looking for at World Market.  They were only $5.95 for a set of 6.  I ordered five sets as I knew I had nearly 30 different spices.

  Stainless Steel Lidded Spice Jars, Set of 6

Once I had received the spice jars, they kind of sat in the box I received them in for awhile.  I knew I wanted labels printed to secure to the top of each jar, indicating what spice was in each jar.  But that's as far as I got with the project.  Until one morning in September, when my family had some very dear friends of ours over for brunch.  I was telling my friend, Missy, all about this project, and she thought it would be a great project to do, as well.  She is so extremely talented, as she produces stamp sets, and makes the most beautiful hand-crafted  cards.  In fact she even has her very own Etsy shoppe.  She offered to make the labels for the jars, and we agreed that we MUST do this project together - just another excuse for us to get together!  I have to give Missy some linky love....she's just too talented not to share her craft with you all.  Please check out her blog at Just Dandy and her Etsy Shoppe at Just Dandy Studio.  She is beautiful inside and out (she's on your right)! That's her cute son photo bombing us!


Fast forward to the month of October.  I sent Missy a list of all the spices I had, and she printed off the labels for her and I.  Missy used a very classic design for the labels, which I just LOVE!
 

Before Missy offered to make the labels, I did search the net for free printable templates for spice labels.  The options are endless, and there are many that are free, so just do a general search for free printable spice jar labels, and you will be amazed at what you will find.  Many also offer tutorials on how to print them.

The next step was to place the labels atop the jars.  To do so, we had to peel the back from each label.  This was a little time consuming, as it wasn't always easy to pull the two apart.  Missy was much better at it than me.


Once we adhered all the labels to the jars, I then began to fill them all with their respective spices.  I used a small funnel, which I also purchased from World Market.  It made transferring the spices from their original container to my new jars, a lot easier.


Here's how they looked once they were filled!

I hope to move my spices from the cabinet they are stored in now to a drawer, so all the labels will be easy to see.  When I get around to making that change, I'll be sure to share with you all the finished, more organized look!  I also wanted to mention a helpful tip Missy gave me...she suggested that I apply Mod Podge over all the labels, as Mod Podge is a water based sealer, glue and finish.  It will help to protect the labels from getting damaged, because essentially the labels are only paper.  I haven't had a chance to do this yet to my labels, but I have purchased the Mod Podge and intend to do so when I get a free minute.  

Perhaps I should now tackle the rest of the cabinet!