Pages

Wednesday, October 31, 2012

Update on Night Stands

For those of you who know me, and for those of you who don't quite yet, I am very indecisive...to a fault.  So, when it came to determining a paint color and the type of paint I was going to use on my night stands, it was painful.  At first, I had thought I would give Annie Sloan's Chalk Paint a try, as it doesn't require sanding or priming.  However, once I started repairing the nightstands with puttying and sanding, I realized that I had pretty much sanded almost every area of the night stands. Annie Sloan's chalk paint is also very expensive, with the wax and all.  Sooo, I turned to some of my favorite blogs for advice, and stumbled upon this very informative blog at Centsationalgirl.com.  She has tons of experience painting furniture, so I totally respect her advice.  She suggested two different types of paint to use on furniture:  Benjamin Moore Advance and Sherwin Williams ProClassic.  She describes them as "water based alkyd enamel paints. Alkyds are drying resins and are used in oil based paints but now synthetic versions are used in water-based enamel paints as well. What’s important is that the enamel gives you a really hard finish, meaning if you tap on it with your fingernail after a week or two of curing it will feel hard to the touch, and not pliable like other latex paints." 

By using one of these type of paints, I would have so many more color options than Anne Sloan's Chalk Paint.  Not so sure this is good for someone who's so indecisive, but I do like options!!

Since these are going in my bedroom, which will be re-painted within the year to Benjamin Moore's Van Courtland Blue.  I wanted something that would coordinate with that color.  It's a dark bluish gray.  So I opted to use the Benjamin Moore Advance, where I was going to be painting my bedroom with Ben Moore.  I went with a coordinating color, Wedgewood Gray

Here's what they looked like once I had finished puttying and sanding!


And, here's what they looked like after two coats of primer!


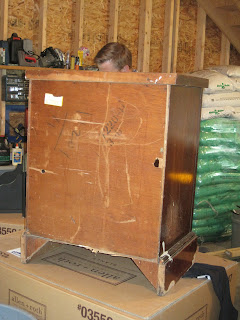
Before I began to paint, I cleaned all the dust and dirt off the night stands. I took off the drawer pull hardware, and filled the holes where the screws had been with wood putty.  Since I will be putting on a drawer knob, which will be centered on the drawer front, I knew I wouldn't be using the existing holes.  My hubby also tore off the plywood on the back of both night stands as they had holes in them, and were in rough shape.  He purchased a 1/4" sheet of plywood to re-cover the backs.  However, we are thinking we will only cover the back of the drawer, leaving the shelves open to the back.  With all of that done, I then applied two light coats of Kiltz Original Primer, allowing to dry between coats. I used a Purdy 2" angled brush.  This is an oil-based primer, which you can use under a water based paint.  Clean up is a bit more, as you have to clean your brushes in Mineral Spirits. 

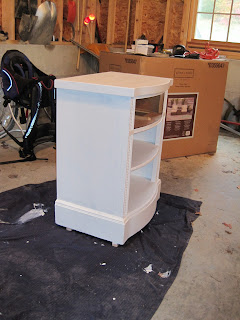
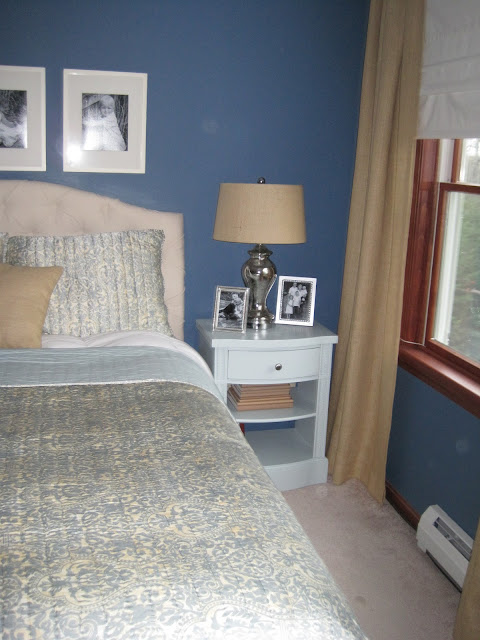
I then began painting.  I used a new Purdy 2" angled brush, and a small roller for the flat surfaces such as the top and sides of the night stands.  I applied 2 full coats, as you could still see some of the white primer after the first coat.  I did a few touch-up jobs after the 2 coat was fully dried.  Please note, you must wait 16 hours between coats, with this paint.  They look amazing! 


Hard to believe I bought these for $25/a piece!!  I knew they had such potential.  With a little bit of paint and a lot of T.L.C. they look brand new!!

Friday, October 19, 2012

DIY Burlap Covered Lamp Shades

Why yes, I have found yet another purpose for burlap.  I know you are all as excited as I am!  I had mentioned in a prior post that I had been thinking about covering my drum-shaped lamp shades in my bedroom with burlap.  Well, I finally got around to doing it.  It was a super easy project, and was able to complete it in a matter of 2-3 hours (dry time, and all).  Take a look at the photo I used for inspiration


Burlap Flared Drum Lamp Shade
Photo courtesy of Pottery Barn

So here's what you need:  1/2 yard of burlap (for two shades)
                                          scissors
                                          glue gun and glue sticks
                                          highlighter
                                          clothes pins
                                          spray adhesive

I started by laying my burlap fabric out on the floor, and then traced around the top and bottom of my lamp shade with a highlighter.  I used a highlighter as I knew it wouldn't bleed through to the other side.  Once this was done, I cut about an inch above the traced lines so to allow for me to fold the fabric over the lamp shade and glue down.  I then used the cut piece of fabric as a template for making the second shade.  Here's what it looked like once it was all cut.


Next, I took the shades, cut fabric, and spray adhesive outside.  Do NOT attempt to spray the adhesive on the shades indoors, as it will leave a sticky residue everywhere.  I laid the fabric out, turning it over so that none of my highlighter markings showed, and made sure the shade lined up with the fabric. What I mean by this is, the top of my shade was smaller in diameter, then the bottom of the shade.  If I didn't make sure the fabric and shade where lined up accordingly, the fabric would not have covered the shade.  I then sprayed a thick layer of adhesive


on the shade itself.  I did this in sections and rolled the shade on its side with the fabric underneath it.  As I rolled the shade along the fabric, the fabric adhered to the shade.  This was the best method, as I could ensure that the shade remained on the fabric, and was lined up so that there was about an inch of fabric left on the top and bottom of the shade.  Until the spray adhesive dries, you do have some time to fix any bubbles or issues where the fabric might not have laid correctly on the shade.  I smoothed the fabric out with my hand, as I went along....though to be honest, the method of rolling the shade on the fabric (making sure the fabric is tout) made for very little issues like that. 


I let the adhesive dry a bit, and then began to trim off a lot of the excess fabric on top and bottom.  I also folded over the fabric to form the seam, which I kept in place by using a clothes pin.  I took my hot glue gun, keeping extra glue sticks handy, and began to run a line of hot glue along the very top of the inside of the shade.  BEWARE:  I initially put glue on the very top of the shade, but that actually, once dried, looks lumpy and bumpy.  So again the best method is to place the glue at the very top of the inside of the shade.  Fold the fabric over the top of the shade, pulling it tight and press down.  I did this in one foot sections, and placed clothes pins on the top of the shade, to hold the fabric against the glue and shade, forming a permanent bond. 

I choose to do the tops of both shades, and then went back and did the bottoms of both shades, again using clothes pins to secure the fabric to the glue and shade!  Please NOTE that you DO NOT want to adhere the area around the seam, until you have trimmed the fabric and made a somewhat level vertical seam.  Once you have done this, pull the fabric tight, glue between the folded fabric, and then glue again the entire fabric to the shade.  If you don't glue both layers of the fold to each other first, the top layer of fabric won't lie flat, and will actually pop out more.  Once the seam is glued down then fold the fabric at the ends over to then be glued to the inside of the top/bottom of the shade. 

It might sound a bit complicated, but it's really easy.  Here's a picture of the finished product.


Here's the before: 


Here's the after:


Now, I actually made trim for the shades, out of 1 inch wide pieces of burlap fabric.  With a little Heat and Bond, I folded both sides of the burlap in to meet each other and then used my iron to secure them together.  This is what they look like, front and back.  They ended up being 1/2" wide which would have been perfect to go around the top and bottom edges of the shade.  HOWEVER, I think I might not even use them as I really like the look of the shades without them.  You'll have to tell me what you think!  Here's the trim, front side: 


Here's the back side: 


This is an idea of what the shade would look like with the trim


The whole purpose of the trim, really, is to avoid seeing the folded over fabric, that was glued to the inside of the lamp, show through when the lamp is actually on.  I didn't notice that the edging showed through all that much, so I kind of like them just the way they are.  But, if I wanted to put the trim on, all I would do is get my nifty glue gun and glue the trim along the top and bottom of the shade. But, here are some from Pottery Barn ..they don't have trim, and they are just beautiful.
Burlap Tapered Drum Lamp Shade

Wednesday, October 10, 2012

Knock-off Ballard Designs Cafe Shelves

Who can't use additional shelving in their home?  Whether it is just for decorative purposes or for function and aesthetics, wall-mounted open shelving is a MUST!  Right now, it is extremely popular to use in place of kitchen cabinets.  Check out these:


Courtesy of BHG.com

51309-doc-restaurant-1_rect540
Courtesy of Apartment Therapy

I'm in love with this look!  It just makes the space seem much more airy.  Perhaps I will consider this when renovating my kitchen (which won't be a for a couple of years), but for right now, I thought shelving like this in my dining room would be fabulous to display some of my blue and white pottery/glassware.  I happened to stumble across these adorable cafe shelves at Ballard Designs

Cafe Shelving

Though, once again, I wasn't about to pay $99.00 - $159.00 for 1, and of course I didn't want just one, but rather two of them.  So, I asked my hubby if he would make me some like these, and he willingly  agreed, okay I had to beg a little!!

I started first with my search for the brackets.  I found some great, cheap wooden brackets with a similar scroll affect at HomeDepot.Com for $6.35/piece.  I ordered 4 of them, two for each shelf.


My hubby had some 2x12 boards laying around from past projects for the top of the shelf, so he just cut them to the dimensions I wanted (12 inches deep by 19 inches), well so I thought, more on that later.

We headed to Home Depot to pick out some trim for the front and sides of the shelves.  We ended up getting a trim that was already primed white, which was perfect as I knew I wanted to paint them black.


Here's the top of the shelf cut to size.


Here's the trim pieces...longer one for front of shelf and shorter ones for sides of shelf.

Here it is with the trim pieces attached to the shelf:


My hubby then attached the 2 brackets to the underneath of the shelf.  We knew we weren't going to
be able to align the brackets so they would sink into a stud when we hung them, so I just eyeballed where I wanted the brackets, and we used some mollys (wall anchors) in the wall, which the brackets would hang from, to support the weight of the shelves and whatever I decide to put on them!  I placed them one above the other in an alcove corner in my dining room.  However, once we got them up on the wall, I realized that the depth (12") was too obtrusive.  You see, 12" seemed fine, but then by the time my hubby added the moldings, they were 3/4" bigger on all sides but the back.  They stuck out off the wall too much...they really were in the way!  Soooo, I begged my hubby to cut off a few inches.  This sounds simple, right!  Wrong....by cutting off some of the depth on the shelf, it affected the brackets.  The brackets would end up being too deep for the shelf.  Thankfully, the brackets could be used either way, so he took the brackets off, then cut off about 3 inches from the back, and reattached the brackets vertically rather than horizontally. Thankfully, he was able to make these cuts without doing any damage to the trim pieces that were attached to the shelf.  Of course, he had to putty over all the areas that needed it, as some wood was damaged when he took the brackets off.  He then had to reapply multiple coats of Flat Black Spray Paint, and Flat Clear Coat Spray.  

The shelves ended up being (with molding) about 21.5 inches long, and 10.5 inches deep!  It's the perfect depth and length for the space.  I think if I were to make more shelves like this, say for my kitchen, I would keep with a similar depth...unless they were being hung in the place of my upper cabinets.  Reason being....if you place a shelf of greater depth on a wall with nothing underneath it, it protrudes off the wall so much, it's actually dangerous.  Trust me, I learned the hard way :)

I haven't had a chance to put anything on them yet, but here is the finished product


Super cute! 


Friday, October 5, 2012

The Screen Room is FINISHED

I am happy to report that our screen room is finished!  Do you hear the trumpets playing and the angels singing?  It looks absolutely amazing!  It's hard to think about having to wait until next Spring/Summer before we can REALLY enjoy it, but for now I'm just marveling at how nice it looks, and how great it will be to be able to be outside, yet sheltered from the hot summer sun and the BUGS!  Yes, folks, in Maine there are a lot of black flies and mosquitoes. 

I have acquired all 5 of the patio chairs I bought at Lowes, and am contemplating whether I should put them together and leave them in the screen room through the winter, or just wait until Spring to put them out there....HUM......

Anyhow, here is the final reveal


I'm already envisioning bright, fun, drapery panels, an outdoor area rug, and so much more.  Will be sure to post updates as they happen, though this little project will have to wait until warmer weather, which most likely won't be until next April or May:-)

Tuesday, October 2, 2012

Night Stands

Happy October everyone!  I don't know about you, but I'm finding it so hard to believe that it's already October.  Time just flies by when you are busy!

I have been looking on Craigslist for a while searching for some night stands for my bedroom.  I have one right now, that matches our bedroom set, but in case you didn't get the memo, matching sets aren't really "in" right now!  I've been lovin' the look of mixing stained furniture with a few painted pieces.  You see, I have a matching bedroom set in a Cherry Stain.  It's a beautiful set, solid maple, but I'm ready for a change, and definitely ready to mixed things up a bit.  Aside from that, I have always wanted TWO matching night stands.  Well, the later part of August, I happened upon an adorable set of night stands on Craigslist.  They looked like antiques.  They were a cherry stain, with detailing down the front, and the curved tops were exactly what I was looking for, as they would compliment my D.I.Y. upholstered headboard.  They were in rough shape, cosmetically speaking!  But, since I want a few painted accents in my bedroom, I thought they would be perfect to paint, and paint covers up so many flaws!  Anyhow, oh how I can deviate, I contacted the seller and purchased both night stands for $50.....SCORE!!  Here's what they look like


Yes, they are in need of some T.L.C., and perhaps a lot of wood putty and sanding, but look at the potential!  Look at those dovetailed drawers.  These night stands are solid pieces of furniture, with great construction.  So I have to salvage them! (Notice the black shelves in the background....that's another project my hubby is finishing up for me...will blog about later)
This past weekend, I applied a lot of wood putty in all the areas that really needed it.  At this point, I have puttied twice, and sanded in between coats.  I may need one more coat of putty, but I will have to wait and see!  I'm thinking I will paint these with Annie Sloan's Chalk Paint.  I have never used this product, but have read so many wonderful things about this paint.  The great thing about Chalk Paint is you don't have to sand the clear coat finish or prime it first.  You simply paint it once, wait for it to dry, and add a wax.  I'll let you know how I make out with it.  It's pretty expensive, at least from what I have read, but it saves you so much time and effort.  There's only one shoppe in Maine that sells it, and I will be headed South next week, and hope to pick up the paint then.  I'm thinking I really like Paris Grey.

 Envision these nightstands flanking my bed, against a dark bluish/gray wall paint.  I'm thinking they will look AMAZING!!!!  Stay tuned for the finished product!!