Pages

Friday, September 28, 2012

Screen Room Progress

Fall is definitely in the air!  The mornings are cool and the air is crisp, and the leaves are starting to turn beautiful, vibrant colors of yellow, red, and orange!  Though I hated to say good-bye to summer, welcoming Autumn was very easy.  I've already started baking apple pies, apple crisp, and have on the agenda to make some pumpkin-chocolate chip bread and cookies!  YUMMY!

While I have been busy baking inside, Joe, our contractor, has been busy working outside!  He continues to make huge progress in the way of our screen room!  The screens are all on, and Joe finished up yesterday with the putting the finishing touches on the inside of the room.  As you will see from the photos below, our lovely exterior pressured-treated frame will all be covered in aluminum coil stock.  This was Joe's clever idea, and it ROCKS!  Aluminum coil stock is a lot cheaper than buying composite boards.  We really didn't want to have to paint or stain the exterior frame, as we wanted there to be little to no maintenance.  So Joe came up with the idea of aluminum coil stock.  They have to form each piece by bending it to the contours of the framing boards!  It looks fantastic and will look so nice against our house, which has white trim around the windows, doors, etc. 


Next Spring, my hubby and I plan to stain the rails and posts white, and then cap off each post with a white or possibly black solar powered post cap.  We found a great deal on these at Home Depot costing all of $5/piece.  They are 4 in. x 4 in. White Plastic Square Solar Panel Post Caps Check them out: 

Again, this will have to wait until Spring.  We plan to stain the deck floor boards then, as well, and will stain that the same color as the pool... a rich dark brown stain. 

In the meantime stay tuned for more photos and updates on the screen room, a few other things I have had on the back burner.

Wednesday, September 26, 2012

Screen Room and Landscaping Update

Hello all!  Happy Wednesday!  It's an overcast day here in Maine, with on-and-off showers, but that's not slowing down our contractor, or the progress that he's making.  Yesterday, Joe and his helper, Dave, got all the shingles on the roof.  Today, they are cutting all the screen to size and stapling that up.  It's coming together so nicely.  It looks so big to me, but I'm sure once I get patio furniture in there, and all the other stuff I'm envisioning, it won't be BIG enough (ha ha)!

I haven't taken a recent picture of the screen room, well not since the day before yesterday, but this is where things were when I took those latest pictures.


I can't help but also showcase all the hardscaping we have done!!  We had 13 ton of river rock (round rocks) delivered to our house almost two weeks ago.  My hubby thought we could save ourselves lots of $ if we did all the hardscaping around the pool.  Well, we did save nearly $1600, but it's tedious work.  We only had a wheelbarrow, and trust me when I say, that doesn't work so well once it's full of rocks!  I nearly tipped the thing over several times, not to mention it's HEAVY!  Thankfully, our neighbor and friend, Ben, let us use his small wagon, which we hooked onto the back of my hubby's lawn tractor, and we loaded each rock one at a time into the wagon, and then placed each rock, one-by-one, in place.  Oh my goodness, is it tedious work, but it looks so awesome.  What do you all think?


Not too bad for amateurs!!! 

Monday, September 24, 2012

Deck update #3


I am super, super happy, as our contractor, Joe, was finally able to make it over and begin our screened-in deck area.  He's still juggling a few other jobs, so he's here when he can be, but the progress is amazing to see.  This is what things look like as of today!


Isn't it awesome.  I am so visual it's ridiculous, so just seeing the space framed in gives me an idea of the space I have to work with.  The most helpful was seeing where the door is going to be, so I can work around that with furniture arrangement, etc.  Well, I wasted no time at all, my friends, in starting my search for patio furniture.  I know you are probably thinking, what....buying patio furniture in the Fall.  Why, yes, it's a great way to save a lot of money...which is always a good thing.  So, I got on-line, once again, and began my search.  Now, when I say patio furniture, what comes to mind?  When I mentioned this term to my hubby, he thought I meant a table and chair set, but on the contrary, I was referring to patio seating, namely a sectional.  You know, comfortable outdoor furniture.  I love some of these from Pottery Barn, but I didn't like the price tag, and they were on sale!


Build Your Own - Torrey All-Weather Wicker Sectional Components

I believe Pottery Barn refers to this type of patio furniture as "Lounging Furniture".  Don't  you love the sound of that!

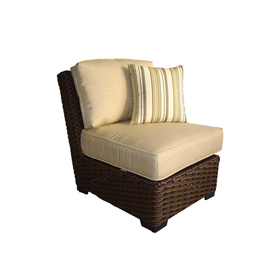
So back to the "hunt".  A lot of patio furniture, at this point in the season, is pretty well picked over.  I looked at my local Home Depot, but they literally had nothing left, so I found a couple of pieces I liked on-line at Target, as well as Lowes.  Both were on clearance, however, the set at Target was just that, a set:  love seat, and two chairs.  I really wanted a sectional, I feel that those are the best choice for a small space.  So, I kept going back to these chairs at Lowes.  It's the Allen + Roth Blaney Patio Chair.  As I read the reviews, which rated this chair with 5 stars, it sounded like it would be a great addition to my deck!  The best thing about these chairs is that they interlock, if you want them to, so you can make a sofa, love seat or use alone.  I loved the versatility of this chair.  I wish they had a corner chair, so I could make a sectional but I think this will work just fine.  So, I called my local Lowes and learned they had 2 chairs left.  They were $125 marked down from $250.  That's 50% off! I really want 5 chairs, so I rushed down to Lowes and purchased both chairs. Of course, I had to make two trips as the boxes these chairs came in were rather large, allowing for only one box in my vehicle at a time....and I have an SUV! 
allen + roth Blaney Patio Chair
I called around to several other Lowes within my state to find 3 more chairs, hopefully all in the same store.  I was successful locating three additional chairs in the Bangor Lowes, which is about an hour from my home.  I will need to borrow my father-in-law's truck to pick them all up, but they allowed me to pay for them over the phone, and they will hold them for me indefinitely.  I thought that was so nice.  Though, I really want to get them sooner rather than later as I always have this fear when I buy something in this manner, that they will go and sell my chairs and I will be left with nothing.  So long story short, I should have five total chairs for my screened-in deck area and I'm so excited.  The next thing I need is an indoor/outdoor rug, and an old exterior door.  Why the door you ask, well I'm going to make a table out of it, when I find the time. 

So, always remember, if you buy things you may need a year ahead, at the end of that season, you can save lots!  I buy everything this way, well most things, especially clothing for my kids. 

Monday, September 10, 2012

Inexpensive Wall Art for Dining Room or Kitchen

I don't know about you, but I have always had a hard time finding the "right" decor for my walls!  In addition to that, I hate to pay a lot of money for wall decor.  If you can relate, boy have I got a GREAT solution for you! 

I have been remodeling my dining room for the past 1 1/2 years.  The only thing left to do to make the room complete was to add some wall decor.  I posted about the idea of framing a piece of fabric or wall paper, which I did.  But, I had another small wall that really needed something, and then it happened, I heard this fabulous idea of framing an old family recipe.  Now, I originally got this idea from the Nate Show, but they were suggesting that you frame a recipe in a table-top frame, to place on your counter tops as decoration.  But, I don't need anymore stuff on my counter tops, so I thought to myself, "why couldn't I type of a family recipe, enlarge it, and frame it to hang in my dining room."  So, that's exactly what I did.  I wanted a square frame, and  A.C. Moore, had these 12"x12" scrap booking frames in black, that I just loved.  They were simple, and exactly the right size for the wall space.  I decided to stack one frame above another, so I bought two 12"x12" black frames.  With the 40% off coupon, I got both frames for just under $9/each.  I then went over to the scrap booking section and bought two card stock scrap booking sheets in a French Vanilla to print the recipe on.  Those were all of .50.  I came home, typed up the two family recipes, one of which was my grandmother's recipe, and another was my great-grandmother's recipe.  I played with the font size and font style, coming up with something that was visually pleasing and, of course, something that would fill the space on the paper.  Then I went to print it and realized that my every day printer could not accommodate a paper as wide as 12".  I figured it wouldn't be too difficult to get the recipes printed at a local copy center.  Well, was I ever WRONG!  The 12"x12" size is so unique and not-standard that it was nearly impossible to find a print shop that could print that size.  I finally stumbled upon a little print shop in Hallowell, Maine, and they were so accommodating, however, the scrap booking sheet was not acceptable to be printed on.  Apparently, laser printers can not print on textured paper, and the paper must be laser-friendly.  They had a white sheet of paper size 12"x18" that they could print on, and then crop for me, but you know me, I wanted a vanilla or ecru backdrop for my recipe.  So, I came back home and started to google laser-friendly 12"x12" paper.  I was so relieved to find a place, LCI, out of Massachusetts that had exactly what I needed (12"x12" laser friendly ecru paper).  I was able to order samples for $1.25 a sheet, and they were shipped for free.  I brought the sheets into the print shop and they were able to print them off, and they came out beautifully.  They only charged me $7 for printing both sheets.

Check them out all framed and hung on my dining room wall, both for a total cost of $26!


Aren't they beautiful!  I just love the idea of displaying family recipes as wall art.  I might have to do this in my kitchen, when I get around to renovating that space.

Thursday, September 6, 2012

Deck/Backyard Update #2

I have been so delinquent in posting about the various projects we have had going on over the past few months, and I'm sooooo sorry about that!  My two oldest (ages 9 and 6) just returned to school last week, and I'm finding that I have a little more "me" time (well while my youngest son naps).  So, I hope to catch you all up on what has been happening around here.

First things first, our deck/backyard project.  If you all remember, we put in an above-ground pool this past Spring.  With that, came major landscaping work, as well as tearing up our old deck, replacing that, and adding on so that it would connect to the pool.  My ever-so-handy father, father-in-law and hubby worked hard one HOT July Sunday to cut and mount all the pressure-treated posts to the outside of the deck.  Then they added the rails and top rails.  The first of August, my hubby and father-in-law, put up all the balusters.  We decided upon aluminum balusters.  We actually ordered them from decksdirect.com, and they arrived in a matter of days.  They went up relatively quickly, and where they are aluminum, we don't have to worry about them rusting or having to stain them.  Several people have actually commented that the balusters actually look like wrought-iron....which I love. 

Here's what it looks like today:


Of course, once the deck was done (well our part anyway, as we are still awaiting our contractor to come to build the screened-in section of the deck) there's was all kinds of landscaping to be done.  We opted to do much of the work ourselves, as we really couldn't see spending thousands of dollars for a landscaper, when we were capable to do the work ourselves.  So, we ordered 12 yards of loam, and starting shoveling, raking, rolling, seeding, and watering.  We decided to break the backyard into sections as we prepared the three various areas to be seeded.  We did this as we only have one hose and just one outdoor water hook-up.  We didn't want to have to spend all day moving the sprinkler from one spot to another, so we opted to do one section at a time, allowing about 2 weeks to water each section.  The grass came in awesome on the two sections we have done, and we are waiting to seed the results of the third section, as that was just seeded on Monday.  It will look nice to have grass again! 


Here's the third section we just seeded the other day

I also heard from our contractor and he hopes to come sometime next week to get started on our project.  We might not be able to enjoy the screened-in deck much this year, but come next Spring/Summer we will enjoy it so much.